
Introduction
This white paper contains information related to an open source defect management tool called Mantis which is freely available for managing all your defects.Where to Download
One can download the latest version of Mantis from http://sourceforge.net/project/showfiles.php?group_id=14963Download the “mantis-stable” and then “mantis-x.y.z.zip”.1.1
PRE-REQUISITE
Operating SystemWindows 2003 Server, MacOS, OS/2, Linux, SolarisDatabase
MySQL database 3.23.2 and higher
SoftwarePHP 4.0.6 and higher
Application ServerApache 1.3, Apache 2.0.54, IIS 6.0 with Web Services Extension
Browser
IE6 and above, Mozilla Firefox
STEPS FOR INSTALLATION – FOR WINDOWS
MySQL Installation
Install MySQL by downloading it from http://dev.mysql.com/get/Downloads/MySQLGUITools/mysql-gui-tools-5.0-r6-win32.msi/from/http:/www.mirrorservice.org/sites/ftp.mysql.com/ .Please follow the below mentioned steps while installing MySQL: (Please remember the password for “root” account)
I. Run Setup.exe. Ignore the warning messages if any.
II. Select Typical Setup and click next until you get to the sign up step. Select Skip and complete the installation.
III. In the Configuration Wizard pick Detailed Configuration from the first option screen. Click next.
IV. Pick Server Machine on the next screen. Next.
V. Select the Non-transactional for database usage. Next.
VI. Pick the first option (Decision Support (DSS)/OLAP). Next.
VII. Make sure both options are checked at the next screen. Next.
VIII. Use the standard character set. Next.
IX. Allow MySQL to install as a Windows Service and launch automatically with Windows.
X. Set the root password to ‘#######’. DO NOT ENABLE ROOT ACCESS FROM REMOTE MACHINES AND CERTAINLY DO NOT CREATE AN ANONYMOUS ACCOUNT.
XI. Execute Settings.
Please check the availability of MySQL in the Start-All Program list.
PHP Installation
Install PHP by downloading it from http://uk2.php.net/get/php-5.2.6-Win32.zip/from/a/mirrorFollow the Steps and complete the installation. Please check the availability of PHP in the Start-All Program list.To successfully install Mantis the PHP must be able to communicate with MySQL. In case you encounter any error which is related to PHP and MySQL integration then check the Environment variable path.
Mantis Installation
Download the mantis from http://sourceforge.net/project/showfiles.php?group_id=14963I. Extract the zip file to your hard drive. C:\Inetpub\wwwroot\mantis
II Access http://[yoursite- normally a localhost]/mantis/admin/install.php. See below
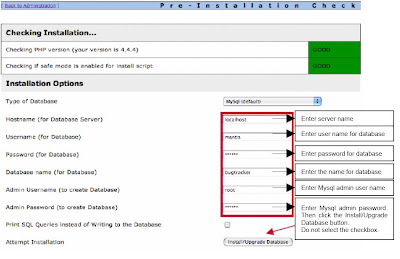
III.The Green color indicates that everything is OK.
IV.Once your installation is complete, then navigate to C:\Inetpub\wwwroot\mantis
V. Open “config_inc.php” file and set the below mentioned parameter for database details:
# set these values to match your setup
$g_hostname = "your server or localhost";
$g_db_username = "your user name";
$g_db_password = "your password";
$g_database_name = "your database name";
$g_db_type = "mysql";
VI. Save and close the above file.
VII. Open mantis as http://
VIII.Enter Administrator as user Id and root as pwd if login for the first time.
IX. Immediately go to Manage and create at least one administrator level account. Immediately after that DISABLE or DELETE the administrator account. You can recreate it but you should delete the account to prevent the cookie_string from being used to trick the package. It would be even better to rename the account or delete it permanently. REMEMBER: After setting up the package, REMOVE the default administrator account.
IMPORTANT CONFIGURATION FOR MANTIS
Email Configuration
You can configure the email by providing the below mentioned parameter in “config_inc.php” file:$g_administrator_email = 'xxx@xyz.com';
$g_webmaster_email = ' xxx@xyz.com ';
# the "From: " field in emails
$g_from_email = ' xxx@xyz.com ';
# the return address for bounced mail
$g_return_path_email = ' xxx@xyz.com ';
For configuring the SMTP server, please make below changes in the “config_defaults_inc.php” file:
$g_phpMailer_method = 2;
$g_smtp_host = your SMTP host name';
$g_smtp_username = 'your SMTP user id';
$g_smtp_password = 'Your SMTP password';
User Creation
Login into Mantis as an administrator and click the Manage Tab->Manage Users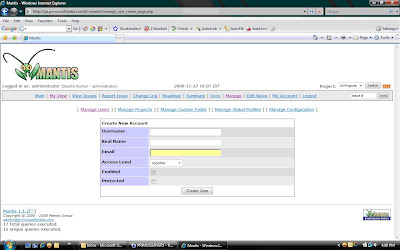
The above screen gets displayed. Provide the desired user name and the appropriate access level. The available access levels are:
Viewer, Reporter, Updater, Developer, Manager, Administrator.
Project Creation
Login into Mantis as an administrator and click the Manage Tab->Manage Projects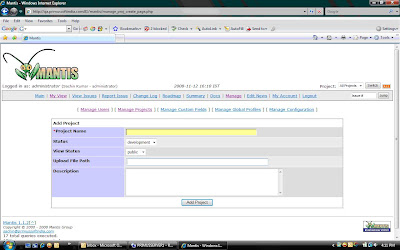
The above screen gets displayed. Provide the desired Project name and the required details and then click the Add project button.
Email Notification
To configure the email notification login into Mantis as an administrator and click Manage Tab->Manage Configuration->Email Notifications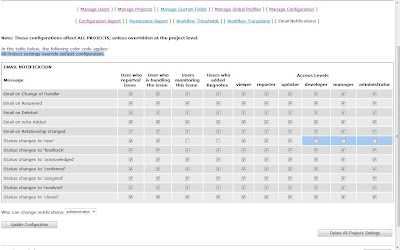
Please tick or un-tick appropriate option as per your requirement and then save the changes by clicking Update Configuration button. The change made here will ensure that who all are going to receive email in case of any changes in the reported defects.Once these configurations are completed, then the Mantis is ready for use for managing defects.
Defect Category Creation
After the Project has been created, then create the various categories for defects which are going to be selected at the time of defect reporting. To create Defect Category, login as an Administrator and Click Manage Tab->Manage Projects->Select the Project. On the edit project page scroll down and locate the Add Category button.
Enter Category name and click the Add Category button. Please follow the same step for creating multiple categories.
Version Creation
After the Project has been created, then create the versions to be selected while reporting the defects. To create Version, login as an Administrator and Click Manage Tab->Manage Projects->Select the Project. On the edit project page scroll down and locate the Add Version button.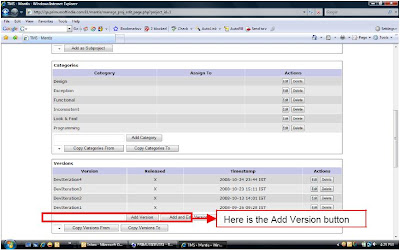
Enter Version name and click the Add Version button. Please follow the same step for creating multiple Versions.
Global Profile Creation
You can create a global profile to indicate the environment on which you are doing the testing of the application. To create a global profile, login as an administrator and click Manage Tab->Manage Global Profile.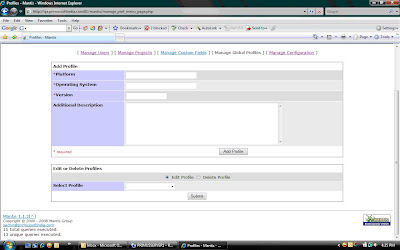
On the above page, enter the details of available field like Platform, Operating System, Version, and any additional description and then click the Add Profile button.The newly created profile is available globally to the entire defect reporter.
DEFECT MANAGEMENT
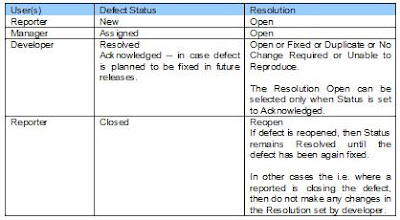
Defect Life Cycle Mantis
Defect Reporting
The users (Reporter) who have the rights to report the defect can use Mantis to report the defects while doing testing of the application. The steps for reporting defects are as follows:
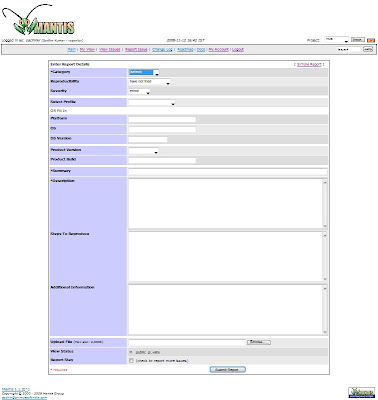
I. Login using your valid user id and password.
II. Click Report Issue link.
III. The above page gets displayed. In case you are not able to view all the above field shown in the screen shot, then click the Advance Report link available in upper right section of the page.
IV. Select the Defect Category, Reproducibility, Severity, Select Profile, Product Version. (You may select mandatory field only but as a good practice please input as much information as one can)
V. Enter a Summary for the defect – would be one liner.
VI. Enter Defect Description
VII. Enter the Steps to Reproduce the Defects.
VIII. You can also enter any other additional information.
IX. In case you want to upload supporting document for the defects like screen shot, video etc., then Upload the desired file.
X. Set the View Status to either Public or Private. Recommended is Private so that only authorized user can view the detail of defect.
XI. Submit the Report
Once the Defect has been submitted, its Status is Set to New and Resolution is Open. Refer Defect Life Cycle Section
Defect Assignment
The authorized user (Manager) can assign the reported defect to the respective developer. The Steps for assigning defect(s) to developer are as follows: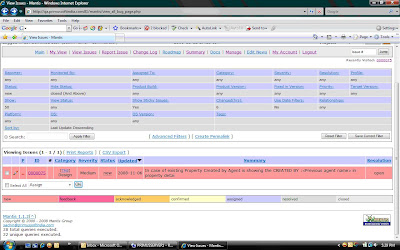
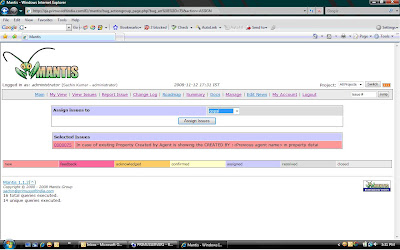
I. Logged into Mantis
II. Click View Issues link
III.Select the Issue which should be assigned. (as shown above)
IV. Select Assign from the drop down
V.Click OK (see above screen shot)
VI.Select the developer name from the drop-down and click the Assign Issues button.
Once the defect has been assigned, the status is set to Assigned and Resolution remains open. (Refer Defect Life Cycle Section)
Defect Resolution
After the defect has been assigned, the developer got email notification of all the issue(s) assigned to him/her. The developer can change the Status and provide the correct Resolution based on his/her defect analysis. The below mentioned scenarios can happen at the developer end:
A. In case Defect is valid:a. Change the Status to Resolved and Resolution to FixedB. In case Defect is not valid:a. Change the Status to Resolved and Resolution to either Duplicate or No Change Required or Unable to Reproduce.
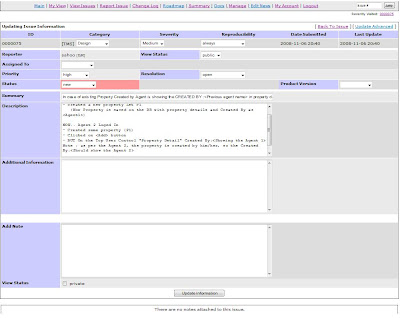
C. In case Defect is valid but planned to fix in future releases:a. Change the Status to Acknowledged and Resolution remain Open.The steps for performing above mentioned change in the defect status and resolution are as follows: (Refer below mentioned screen shot)
I. Logged into Mantis
II. Click View Issues link
III. Click the Issue
IV. Click the Update Issue button
V. Change the Status and Resolution and save the changes.
Defect Closure
After the defect status has been marked as Resolved, then the reporter verifies the defect for its closure. The below mentioned scenarios can happen at Reporter end:1. In case defect is found to be fixed during verification:o Change the Defect Status from Resolved to Closed. Do not make any changes in Resolution.
2. In case defect is found not fixed during verification:o Do not change the Status but change the Resolution from Fixed to Reopen
In such cases the defect again moves to Assigned and so on.
3. In case defect is dropped by developer and reporter found that the defect still exists:o Do not change the Status but change the Resolution to Reopen.
The Reporter follows the same steps as developer to change the Defect Status. Please see section Defect Resolution
Your views and comments are welcome on above white paper.
Comments
Thanks for posting this. I have installed Mantis, It is amazing.
But the mail configuration is not working. When a new user signs up, mantis confirms that it has sent a mail for username/pwd details.
But I do not receive any mail. I did the exact settings a u suggested.
Can you pls help me.
Thanks,
Raj
The reason for not receiving the mail might be with the SMTP host configuration which you should set in the config_default.php.
For any further query mail me.
Sachin
I have installed Mantis 1.1.6 with Xampp1.7 on windows xp everything works good but am not able to create users through mantis the emails are not received i made all necesssary changes u seggested in config_default.php, config_inc.php, and xampp/apache/bin/php.ini too it didnt work
We would appreciate your early response
my mail id is nagaraj.mamedi@gmail.com
Thanks & Regards
Nagaraj